Like many mothers, things I wanted to do and achieve for myself during the childrearing years were put on the backburner in favor of what my kids wanted, what they needed. In a busy nest filled with babies to birth and bathe and feed and teach how to fly—protecting and doing my best to form them into fine, functioning, happy, kind and compassionate contributors to society—there was no time to consider much less execute my plans for personal goals. So they were set aside, placed on a list of things I'll do some day.
Some day arrived last Saturday. With a nest that's been empty for some time now, I finally—finally, I say—plucked one of the items from my "Some Day I'll..." list, gathered the goods, and accomplished something I had been wanting to do for years.
I made bagels.
Homemade bagels.
From scratch. The kneading, the forming, the boiling, the topping with yummy cheeses and cinnamon (not on the same ones, of course), and the baking to golden perfection. I did it all.
Yes, indeed, I made bagels.
And yes, indeed, they turned out awesome.
So awesome, in fact, that I called Jim out of bed earlier than he wished to be called on a Saturday morning. "Come look at what I made for breakfast," I coaxed him. "I'm so proud of myself! You will be, too!" And he was.
I texted my three daughters with photos of my achievement. They oohed and aahed and said "Yum!" and Brianna texted, "Can I come over for breakfast?" And she did. And I shared.
And I grabbed my camera to share my bagelicious beauties with you, too.
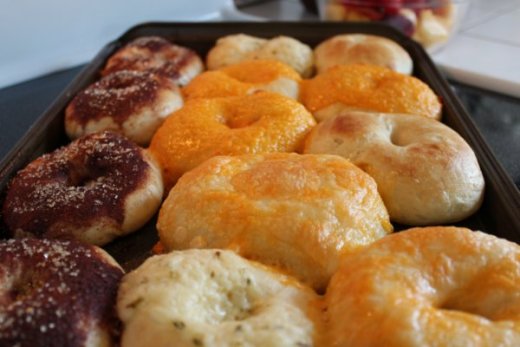
See what I mean? They look good enough to rival those we spent years and years purchasing from the bakery, the bagel shop. I can honestly say—and Jim and Brianna concur—they tasted as good as they look. So not only will I share with you the photo, I'll share with you the recipe, too.
This is a combined recipe, a melding of one from Taste of Home Cooking School Cookbook and the one included with my bread maker. Yes, I used the bread maker for the kneading, so this recipe is geared toward placing the ingredients in that, but you could surely make them without one.
Homemade Bagels
1 1/4 cups warm milk
1/2 cup butter, softened
1 egg yolk
4 cups bread flour
1 teaspoon salt
2 tablespoons sugar
1 1/2 teaspoons active dry yeast or bread machine yeast
Melted butter, for brushing on tops
Toppings such as cinnamon sugar, cheese slices (I used cheddar, colby/jack, and pepper jack), poppy seeds, sesame seeds, onion bits, if desired
Preheat oven to 425 degrees. Place all ingredients except melted butter and toppings in machine in order listed, making a well in the flour for the yeast. Let the machine knead the dough one time (about 10 minutes), then turn off machine and let dough rise 20 minutes in the machine.
On floured surface, divide dough into 12 circles. Push your thumb through center of each circle to make the hole, and stretch to form bagel shape. Place circles on a well-greased baking sheet, cover, and let rise for 15 to 20 minutes.
In nonaluminum pan, slightly boil two inches of water. Slowly submerge three or four bagels at a time into the water. Cook for about 30 seconds on one side then flip and cook about 30 seconds on the other. Carefully remove bagels with slotted spoon and place on wire racks to let excess water drip off.
Place bagels back onto well-greased baking sheet. Brush tops with butter then add toppings, if desired. Bake 8-10 minutes or until slightly browned.
Makes 12 medium bagels (though I ended up with 13 because one of the 12 was huge so I divided it)
A little time consuming, yes. But hard? Not at all. And definitely worth it. I kept asking myself—after Should I have another...and another?—why in the world I didn't try making bagels sooner. Like when my bagel-loving daughters were still at home. They shouldn't have been placed on a some day list, they should have been made now, even back when the now seemed so impossibly busy.
Those boiled and baked delights have me looking at my some day list in a new light. In a nest emptied of kids but filled with time and possibility, there's no stopping me now. That's the kind of wild woman I've become, by golly—a wild, homemade-bagel-making woman, that is.
Like I said: There's no stopping me now.
Today's question:
What's your favorite kind of bagel? Have you ever tried making them yourself?